This guide provides a step-by-step procedure for performing an ECG test using Amedtec ECGpro with LEMR integration to Zedmed Clinical. ECGpro is compatible with Amedtec Cardiopart12 USB and Cardiopart12 Blue (Bluetooth) ECG devices.
The instructions below are designed for LEMR version 2023.10.9.1642 and later. If instructions for earlier versions are required, please contact LEMR Support.
3. Click on the LEMR icon with the patient's name next to it.
4. Click on ECG.
5. Choose a specific LEMR Client computer to start the test on.
6. While the test is in progress, a window will be displayed over Zedmed. LEMR Client will pop up over the top.
7. LEMR Client will pop up asking to start a test – select ECGpro to start the test.
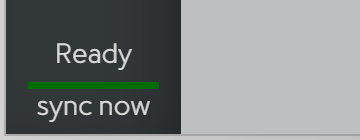
Note: If LEMR Client does not appear, click on the LEMR Client icon at the bottom of the screen or open LEMR Client from the desktop icon.
Then click on Sync Now at the lower left side of the LEMR Client window.
8. AMEDTEC ECGpro will now open. If the ECG device is properly connected, a patient diagram will be displayed. If you do not see the patient diagram, please follow the directions on-screen to connect your ECG device.
9. Connect all patient electrode leads to the patient.
Start with the Right Leg electrode (labelled either RL for Right Leg in American AHA or N for European IEC labelling standard) as this is the primary lead for checking signal quality. The bars under the patient image will show signal quality from each lead – green is best.
If any of the bar graphs appear in yellow (improve if possible) or red (improvement necessary), check electrode contact on that individual lead to improve the connection. If all leads are showing in yellow or red (in a semi-uniform pattern), it is necessary to check the RL / N electrode for contact issues. RL / N doesn't have its own bar graph because all leads are affected when there are connectivity issues with the RL / N electrode.
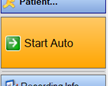
10. Click the big Start Auto button. This button will be disabled if any leads are not connected properly.
You can also use the red start button to start the test, though you must make sure that the blue bar above the timer has reached the end or there will be no interpretation performed on the ECG. This allows you to monitor the patient prior to saving the last 10 seconds of captured ECG trace.
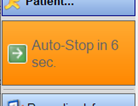
11. The ECG will automatically complete in 10 seconds, then show the review window.
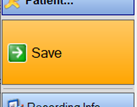
12. Click on the Save button.
13. When the LEMR Client window pops up, the test should be made ready for Zedmed to collect - the test icon will go from an uploading icon to a circled tick.
14. LEMR Server will detect the finished test and automatically import it into Zedmed Clinical. The imported test will be stored in Images/ECG. Click OK.