This article explains how LEMR updates work to a technical audience. If you are an IT Support Engineer or a Managed Service Provider, this article will give you some insight into how LEMR updates work in your environment.
¶ LEMR - Troubleshooting Update Issues
LEMR has a robust auto-update feature that we control through our administrative portal. We endeavour to accomodate a wide range of environments for using LEMR including terminal servers, master images, firewalls, and software restriction policies. As such, we aim to fail gracefully when these environments prevent LEMR from updating. This article should cover how to service LEMR updates in various environments.
For background information on how LEMR operates, please view LEMR - How it Works & FAQ
Versions of LEMR prior to 2023.5.9.1112 will need to be manually updated. Please view this guide for more information:
¶ How to check installed LEMR version
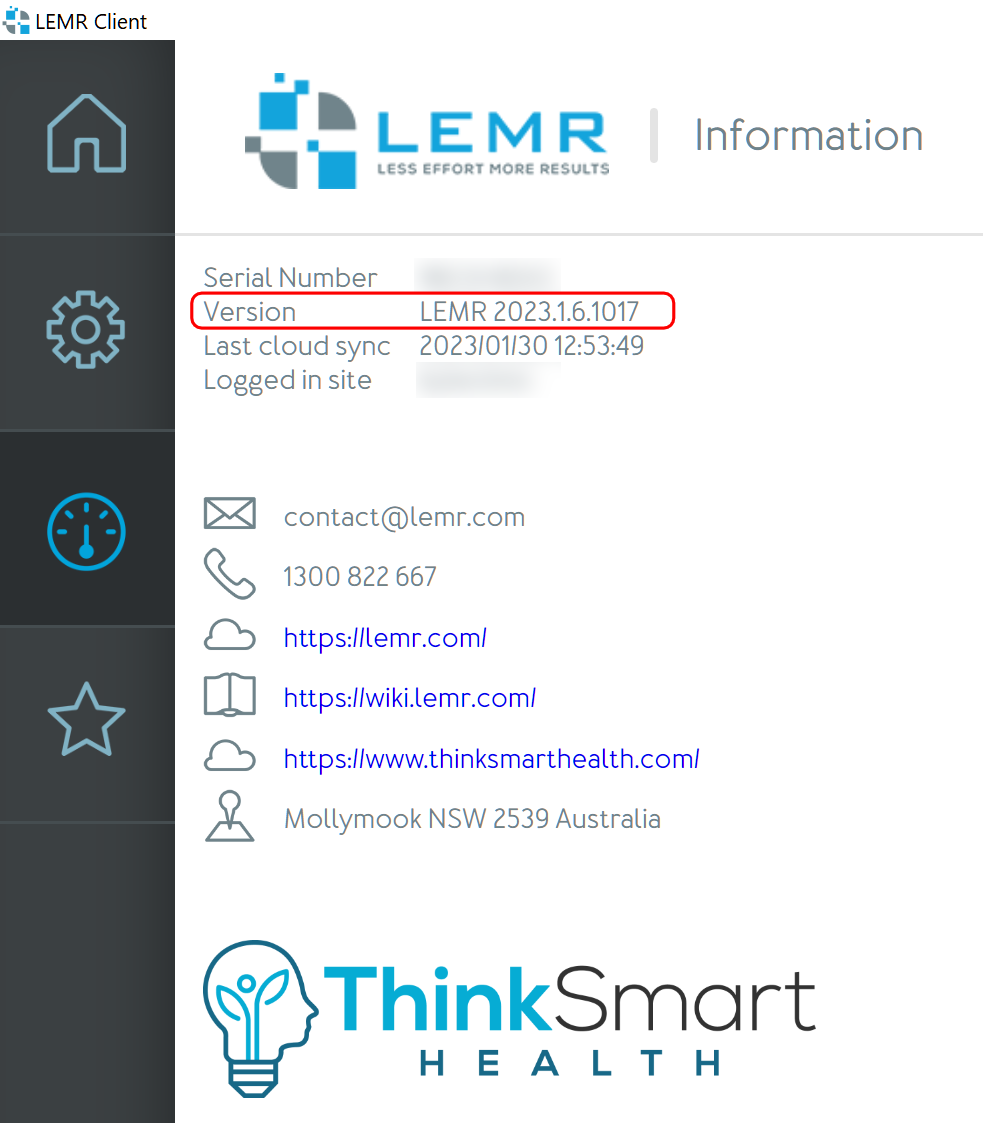
¶ LEMR Client version number
(Usually installed on treatment computer.)
1. Open LEMR Client from the desktop.
2. Click the LEMR Information button.

3. View the version number, second in the list.
¶ LEMR Server version number
(Usually installed on terminal server, triage computer, but can also be installed on treatment computer.)
- Open LEMR Server from the desktop.
- Click “Options”.
- View the version number in the lower-left corner.

¶ When does LEMR receive an auto-update?
LEMR software checks for updates under certain circumstances. An update is only offered to the LEMR software when we configure the location (distinguished by the logged-in site ID) to receive a new version. We control which sites receive updates through our administration portal.
¶ LEMR Client Auto-Update
- LEMR Client checks for a new version when the software is started, or when it performs a sync.
- If the server reports a new version, LEMR downloads the new version to the user's %temp% directory.
- The next time LEMR Client is launched, LEMR Client will attempt to automatically update. This makes it most likely that an update will be installed when the computer is first booted at the beginning of the day.
¶ LEMR Server Auto-Update
- LEMR Server checks for a new version when it performs a sync. This may occur when a user has scheduled a test from Best Practice.
- If the server reports a new version, LEMR downloads the new version to the user's %temp% directory.
- LEMR Server will attempt to install the new version when it is closed. This makes it most likely that an update will be installed after the user has completed a test.
¶ How to tell if LEMR failed to update
1. Navigate to:
C:\ProgramData\LEMR
2. If an update has failed, 2 blank files with no extension will be present in this folder:
- LEMR_2023.1.6.1017 (version number that failed to install automatically)
- UpdateIssue
These files are flags that indicate that the update has failed. They also prevent LEMR from attempting to update to this version again. If you wish to make LEMR attempt to auto-update again, simply delete these two flags.
¶ Force LEMR to attempt to update again
1. Navigate to:
C:\ProgramData\LEMR
2. If an update has failed, 2 blank files with no extension will be present in this folder:
- LEMR_2023.1.6.1017 (version number that failed to update)
- UpdateIssue
3. LEMR will not try to update again while these files are present. Please delete the two blank files (LEMR_2023.1.6.1017 & UpdateIssue).
Follow instructions for LEMR Client or LEMR Server:
¶ LEMR Client force auto-update
See LEMR Client Auto-Update for more information on when LEMR Client runs an auto-update.
4. Open LEMR Client from the desktop.
5. Press the sync now button to get LEMR Client to check for an update. Wait a minute for the update to download in the background. If you like, you can view the downloaded update file in %temp%.
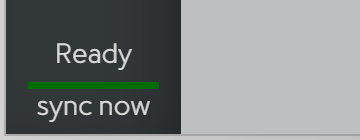
6. Right-click the LEMR Client icon in the system tray. Select Quit.

7. Launch LEMR Client from the desktop again. LEMR should attempt to install an update.
8. After the update, LEMR Client will start again. You can check the version number to see if the update was installed successfully.
¶ LEMR Server force auto-update
See LEMR Server Auto-Update for more information on when LEMR Server runs an auto-update.
4. Lauch LEMR Server from the desktop.
5. Press Refresh to get LEMR Server to check for an update. Wait a minute the update downloads in the background. If you like, you can view the downloaded update file in %temp%.
6. Close LEMR Server. LEMR will attempt to update in the background. There may not be any indication on screen that it is updating. You can view the running LEMR processes in Task Manager under the Details tab. All LEMR processes start with “LEMR” in the name.
7. Launch LEMR Server to check the version number and see if an update was installed.
Need Help?
LEMR customers can get help by contacting LEMR Support.