¶ Best Practice Orchid edition - BP to Office Medic Proxy compatibilty issue
If you are running BP Orchid edition and get the following error when trying to launch an ECG or Spirometry test in Office Medic via Best Practice, it means that the old BP to Office Medic Proxy application is no longer able to communicate with the new BPDevice components released in the new BP Orchid. The great news is our LEMR solution is fully compatible with BP Orchid edition and Office Medic! To get your Office Medic ECG and Spirometer integration up and running again with ongoing support, contact us! QRS Universal ECG devices (USB and Serial), QRS Orbit Spirometer (USB) and Vectracor Universal SmartECG (USB) devices are fully supported in LEMR.
Need Help?
LEMR customers can get help by contacting LEMR Support.

Error details:
************** Exception Text **************
System.IO.FileNotFoundException: Could not load file or assembly 'BPDevice, Version=1.0.5.0, Culture=neutral, PublicKeyToken=093d1fdeef495a0c' or one of its dependencies. The system cannot find the file specified.
File name: 'BPDevice, Version=1.0.5.0, Culture=neutral, PublicKeyToken=093d1fdeef495a0c'
  at OfficeMedicTest.MainWindow.Init()
  at OfficeMedicTest.MainWindow.MainWindow_Load(Object sender, EventArgs e)
  at System.Windows.Forms.Form.OnLoad(EventArgs e)
  at System.Windows.Forms.Form.OnCreateControl()
  at System.Windows.Forms.Control.CreateControl(Boolean fIgnoreVisible)
  at System.Windows.Forms.Control.CreateControl()
  at System.Windows.Forms.Control.WmShowWindow(Message& m)
  at System.Windows.Forms.Control.WndProc(Message& m)
  at System.Windows.Forms.ScrollableControl.WndProc(Message& m)
  at System.Windows.Forms.Form.WmShowWindow(Message& m)
  at System.Windows.Forms.Form.WndProc(Message& m)
  at System.Windows.Forms.Control.ControlNativeWindow.OnMessage(Message& m)
  at System.Windows.Forms.Control.ControlNativeWindow.WndProc(Message& m)
  at System.Windows.Forms.NativeWindow.Callback(IntPtr hWnd, Int32 msg, IntPtr wparam, IntPtr lparam)

WRN: Assembly binding logging is turned OFF.
To enable assembly bind failure logging, set the registry value [HKLM\Software\Microsoft\Fusion!EnableLog] (DWORD) to 1.
Note: There is some performance penalty associated with assembly bind failure logging.
To turn this feature off, remove the registry value [HKLM\Software\Microsoft\Fusion!EnableLog].

************** Loaded Assemblies **************
mscorlib
   Assembly Version: 4.0.0.0
   Win32 Version: 4.8.4515.0 built by: NET48REL1LAST_C
   CodeBase: file:///C:/Windows/Microsoft.NET/Framework/v4.0.30319/mscorlib.dll
----------------------------------------
BPtoOMproxy
   Assembly Version: 1.0.2.26
   Win32 Version: 1.0.2.26
   CodeBase: file:///C:/Program%20Files%20(x86)/QRS%20Diagnostic/Best%20Practice%20Proxy/BPtoOMproxy.exe
----------------------------------------
¶ splwow64.exe ColorAdapterClientUpdateDisplayGamma error when printing a PDF (save to file) in Office Medic version 5.8.1 upwards
Symptom
Error appears when producing a PDF that stated the following:
<Title>splwow64.exe - Entry Point Not Found</Title>
The procedure entry point
ColorAdapterClientUpdateDisplayGamma could not be
located in the dynamic link library
C:\WINDOWS\system32\spool\DRIVERS\x64\3\mscms.dllSolution
- Open the folder
C:\WINDOWS\system32\spool\DRIVERS\x64\3 - Rename mscms.dll to mscms_orig.dll
PDF printing will now work in Office Medic. Note that there may be other printers installed on the system that rely on this file; please test other printers to ensure printing works as expected.
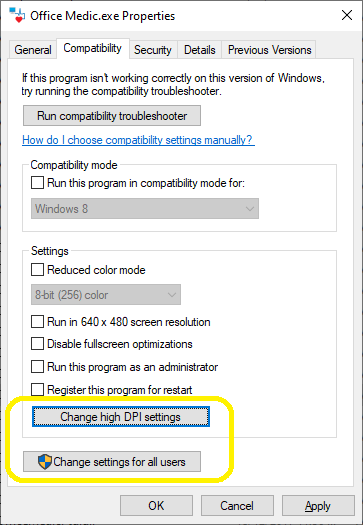
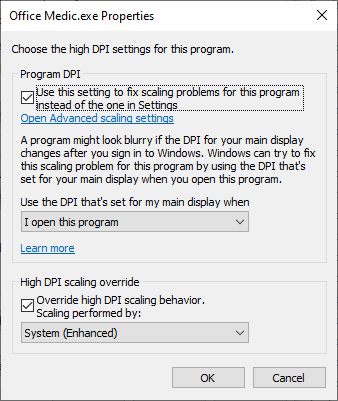
¶ Increase size of buttons in Office Medic application on small screens with high resolution
By default, the size of the buttons in Office Medic do not change when DPI settings are adjusted in Windows. To force these DPI changes, we must use the Application Compatibility options available in Windows.
To do this:
- Find the Office Medic icon on the desktop
- Right-click on the icon and choose Properties
- Click on the Compatibility tab
- If you need to adjust the setting for all users on this computer, click on the Change settings for all users button; if you don't have permission to do this or you only need this setting for the current Windows user, proceed to the next step
- Click on the Change high DPI settings button
- Tick both boxes on the form, change the first dropdown to I open this program and the second dropdown to System (Enhanced)
- Click OK button for the two open property pages (three if the settings were changed or all users)
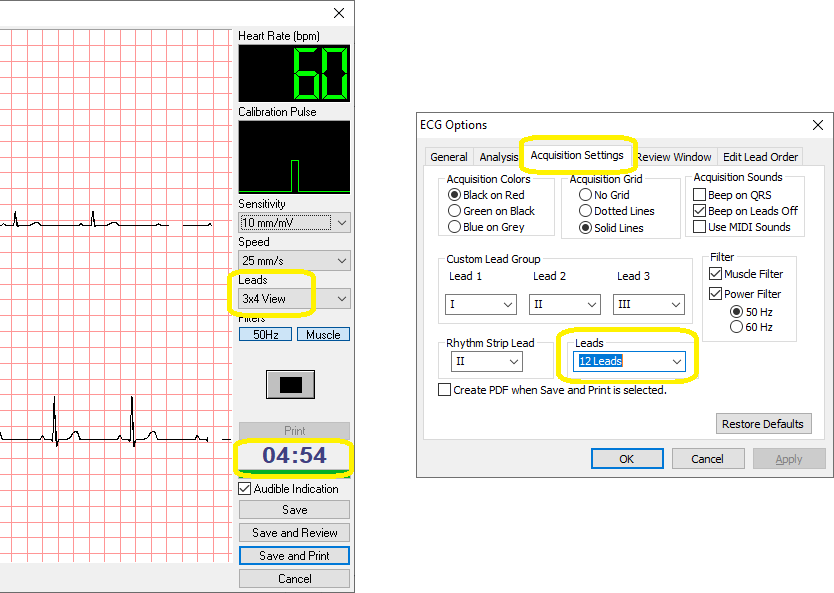
¶ Office Medic ECG capture performance issue on slower CPUs
On Intel Atom CPUs and systems with slower processors, if an ECG test is run with the Leads view set to 3x4 View, the timer may appear to lag at times and Office Medic may crash after a minute or two. If you see the timer misbehaving, it could be this issue or it could be an issue with the latency setting for the FTDI adaptor used with the ECG.
To work around this specific performance issue:
- Open Office Medic from the icon on the desktop
- Go to the Options menu, then to ECG…
- Click on the Acquisition Settings tab, then change the Leads dropdown to 12 Leads - this will adjust the default view when capturing an ECG
- Click OK and close Office Medic
¶ Error when producing a PDF from Office Medic - Error 1012: You have an old version of Ghostscript installed
When producing a PDF in newer versions of Office Medic, an error may appear as follows:
Window title: PDF Writer - bioPDF

An error occurred.
Error 1012: You have an old version of Ghostscript installed. Ghostscript version 8.50 or newer is required. Please install a newer version.
Source: GUI
Internal hint: Run converter to create PDF file
Developers: You can hide this message with the "suppreserrors" setting.
This means that some old GhostScript files are hanging around in the Office Medic directory. To fix this:
1. Download the latest GhostScript version install files for both Windows x86 and Windows x64 from https://www.ghostscript.com/releases/gsdnld.html
2. Install both packages on the computer, installing to the default directory; keep note of the install directory for each package
3. Go to the installation directory for the x64 package then open the folder named bin
e.g. C:\Program Files\gs\gs10.06.0\bin
4. Copy the files from the bin folder directly into the bioPDF installation directory
e.g. Copy from C:\Program Files\gs\gs10.06.0\bin
To: C:\Program Files\bioPDF\PDF Writer\gs\
5. Repeat process for the files in the profiles directory, copying all from the folder to the bioPDF folder.
e.g. Copy from C:\Program Files\gs\gs10.06.0\profiles
To: C:\Program Files\bioPDF\PDF Writer\gs\
6. Go to the installation directory for the x86 package then open the folder named bin
e.g. C:\Program Files (x86)\gs\gs10.06.0\bin
7. Copy the files from the x86 bin folder directly into the bioPDF installation directory
e.g. Copy from C:\Program Files (x86)\gs\gs10.06.0\bin
To: C:\Program Files\bioPDF\PDF Writer\gs\
This issue should now be resolved! Try producing another PDF.
¶ Error when printing an ECG from Office Medic - Path cannot be the empty string or all whitespace
When choosing Save and print or when clicking on the Print icon on the toolbar in Office Medic on Windows 10 and 11 systems, an error may appear as follows:
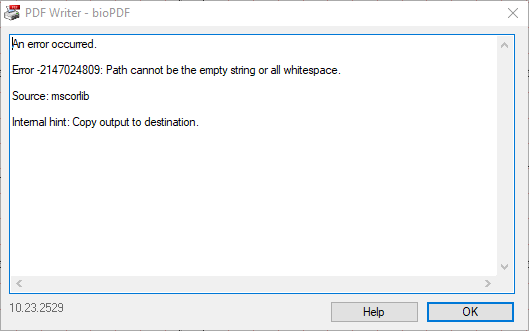
Office Medic expects a default printer to be set, which doesn't occur when Windows is managing the default printer automatically.
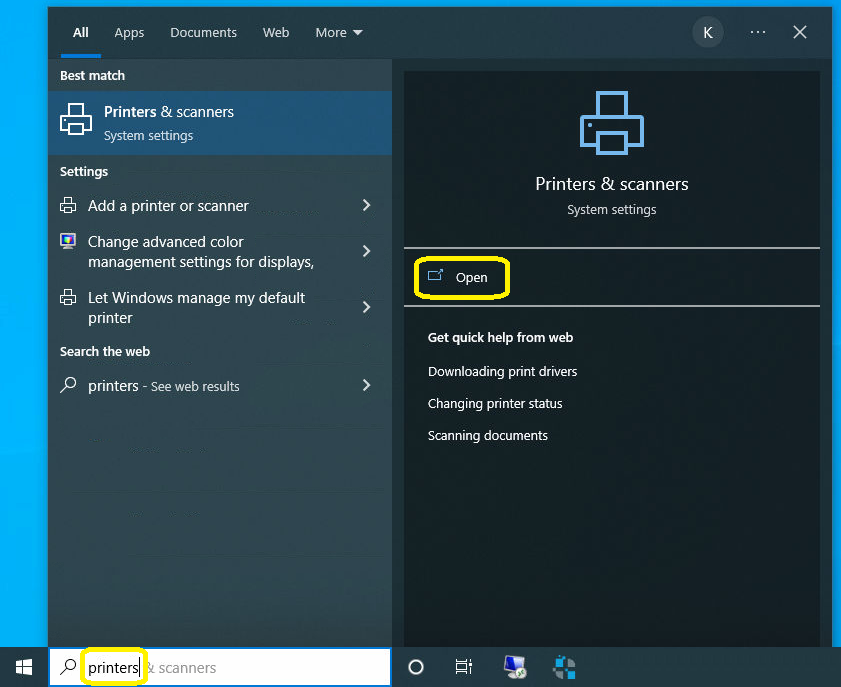
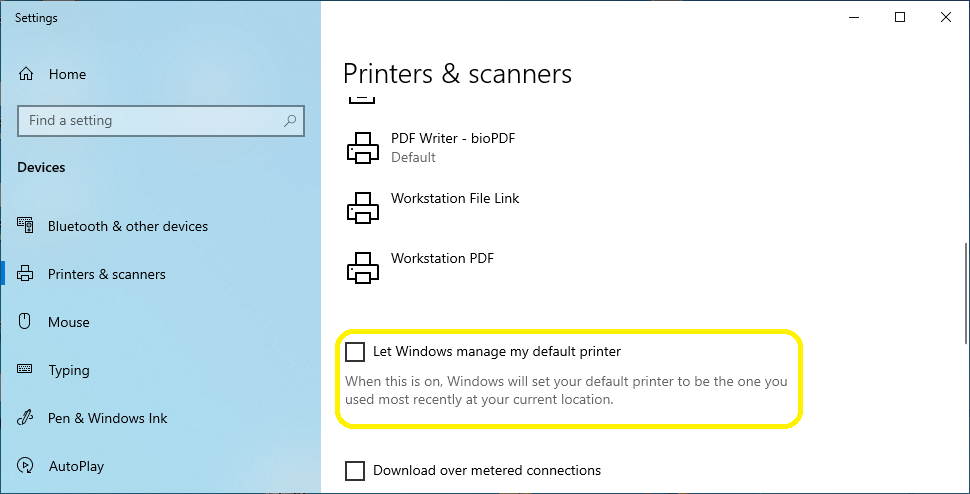
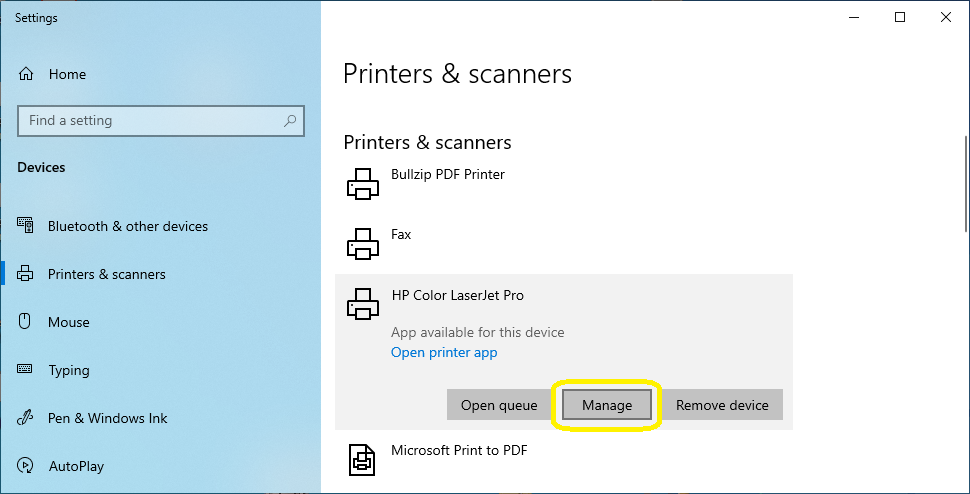
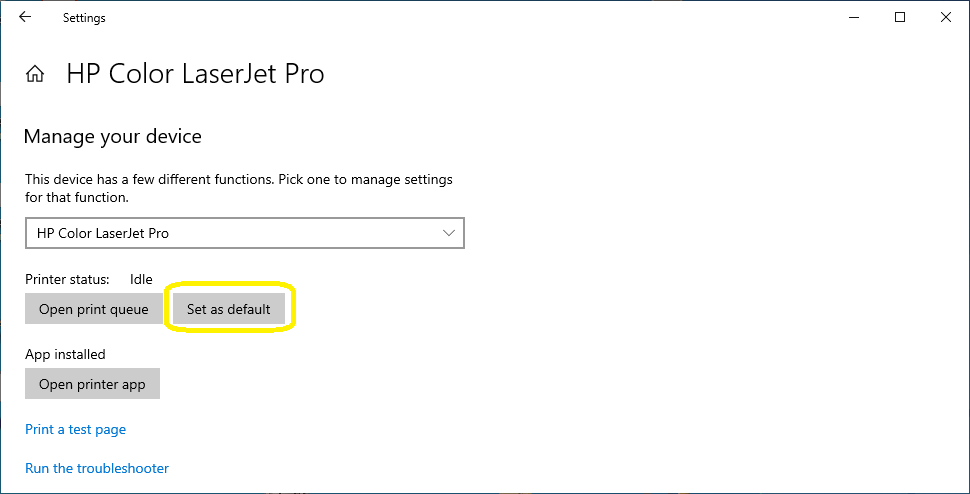
To fix the issue in Windows 10:
1. Open the Printers & Scanners app
2. Scroll down and untick Let Windows manage my default printer
3. Find your preferred printer in the list above, click on it then click Manage
4. Click Set as default then close the window - you should be able to print in Office Medic now
¶ Universal ECG Bus Controller driver incompatibilty
Please see this article for more information on driver issues: https://wiki.lemr.com/en/support/technical-support/qrs-universal-ecg-bus-controller-driver-incompatibility
Note: this article only applies to the QRS Diagnostic ECG devices with original manufacturers' USB trunk leads and does not apply to ECG devices originally using a serial port-based trunk lead (with or without a seperate connected USB to Serial adaptor cable), or any ECG devices converted to USB by any non-original USB trunk lead.
Need Help?
LEMR customers can get help by contacting LEMR Support.